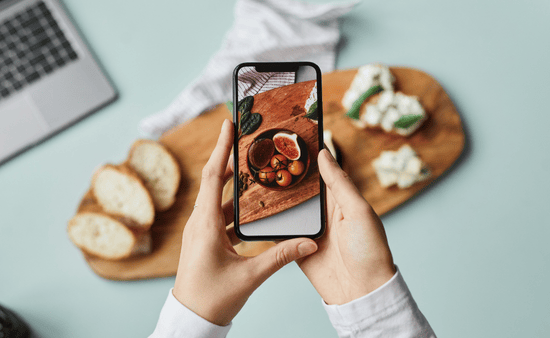
Food photography has evolved from a niche professional discipline into a common form of digital storytelling. Capturing the perfect shot of a home-cooked meal or a freshly baked pastry requires more than just a high-quality camera; it demands an understanding of how light, texture, and composition interact within a residential setting.
While professional studios offer controlled environments, the home provides a unique, authentic backdrop that can make food appear more relatable and appetizing. Achieving professional-grade results at home is a matter of discipline and observation. By mastering the nuances of your environment, you can transform a simple plate of food into a compelling visual narrative.
1. Prioritize Natural Indirect Light
Light is the most critical element in food photography. In a home setting, where organizing your kitchen plays an important role in creating a clean and distraction-free environment, the temptation to use overhead kitchen lights or a camera flash is high, but these sources often create harsh shadows and unappealing yellow or blue color casts. For the most flattering results, rely almost exclusively on natural, indirect sunlight.
Position your “set” near a large window, ideally one that faces north or south to avoid the direct, high-contrast glare of the sun. The goal is to have soft, diffused light “wrap” around the food, highlighting its texture without washing out the details.
If the light is too intense, a simple sheer white curtain can act as a professional-grade diffuser. Additionally, using a white foam board opposite the light source can bounce light back into the shadows, creating a balanced and airy look that mimics a professional studio setup.
2. Master the Three Primary Angles
Not every dish looks best from the same perspective. To improve your home photography, you must learn to identify which angle best highlights the architecture of the food. Generally, food photography relies on three primary angles: the overhead (flat lay), the 45-degree angle, and the eye-level shot.
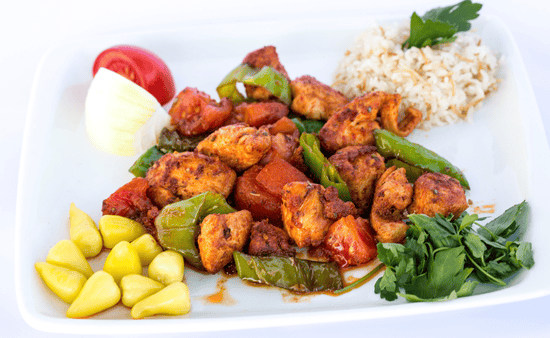
The overhead shot is ideal for “busy” tablescapes, bowls of soup, or pizza, where the geometry and arrangement of ingredients are the stars. The 45-degree angle is perhaps the most common, as it mimics how we naturally see food while sitting at a dining table; it is excellent for showing both the top and the side of a dish.
Finally, the eye-level shot is essential for “tall” foods, such as stacked pancakes, burgers, or layered cakes, where the height and internal layers are the most important features to capture.
3. Leverage Textures and Neutral Backgrounds
The surface beneath your plate acts as the foundation of your image. In a home environment, you are often limited by the countertops or tables available. To create variety, many photographers use “portable” backgrounds like wooden cutting boards, marble slabs, or even textured linen cloths.
Neutral colors—such as grays, whites, and dark wood tones—are preferred because they do not compete with the colors of the food. A bright red background might distract the eye, whereas a slate-gray surface will make the vibrant greens of a salad or the golden crust of bread stand out.
If your current living space lacks the appropriate surfaces or the necessary natural light to act as a backdrop, many enthusiasts find that a home addition in Layton provides the perfect opportunity to design a dedicated “morning room” or sun-drenched breakfast nook specifically optimized for both living and creative pursuits.
4. Employ the Rule of Thirds and Negative Space
Composition is what guides the viewer’s eye through the image. One of the most effective ways to create a balanced photo is the “Rule of Thirds.” Imagine your frame is divided into a 3×3 grid; instead of placing your main subject directly in the center, place it along one of the grid lines or at the intersections. This creates a sense of movement and interest.
Equally important is “negative space”—the empty area around the food. In home photography, there is often a tendency to clutter the frame with too many props. However, leaving open space allows the viewer’s eyes to rest and ensures the food remains the undisputed hero of the shot. A single fork or a scattered cloth in the periphery can suggest a human presence without overwhelming the primary subject.
5. Focus on Styling and “The Hero” Ingredient
Food styling is the art of making a dish look its absolute best for the camera, which is often different from how it looks when it is ready to be eaten. When photographing at home, focus on “The Hero”—the most attractive part of the dish. This might be a particularly vibrant slice of tomato, a perfectly melted piece of cheese, or a dusting of flour on a loaf of bread.
To enhance the visual appeal, use garnishes that are already present in the dish. A sprinkle of fresh herbs, a drizzle of olive oil, or a few grains of coarse sea salt can add necessary highlights and texture. It is also helpful to undercook vegetables slightly so they retain their bright, vivid colors, as overcooked produce often appears dull and “muddy” through a lens.
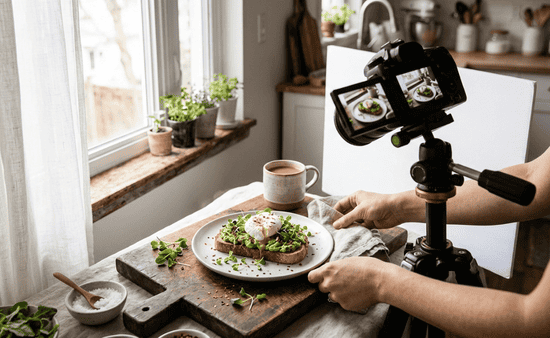
6. Utilize a Tripod for Sharpness and Consistency
Camera shake is a common issue in home photography, especially when working with natural light indoors where shutter speeds may be slower. Using a tripod is one of the quickest ways to elevate your work from amateur to professional. A tripod allows you to lock in your composition, leaving your hands free to adjust the styling of the food.
Once the camera is fixed in place, you can make micro-adjustments to the placement of a garnish or the angle of a napkin without losing your perfect frame. This consistency is vital if you are taking a series of shots for a blog or a digital gallery.
Furthermore, a steady camera allows you to use a lower ISO, which reduces “noise” or graininess in the image, resulting in a crisp, high-definition photo that captures every minute detail of the meal.


